
1. 引言
在现代软件开发中,自动化工具已经成为不可或缺的一部分。然而,传统的自动化工具往往局限于特定场景,无法灵活适应复杂的用户需求。为了解决这一问题,OpenHands 应运而生。
OpenHands 是一个自动化 AI 软件工程师,旨在通过端到端的交互流程,帮助用户完成从代码生成到测试运行、从文件操作到 Web 自动化等多种任务。它的核心组件——Agent,能够智能地解析用户请求、分解任务并协调执行环境完成操作。
OpenHands 的独特优势
- 自然语言交互:用户可以通过简单的自然语言描述任务,无需掌握复杂的技术细节。
- 模块化设计:系统由多个独立模块组成,支持灵活扩展和动态调用。
- 安全性与隔离:通过沙箱技术和严格的权限管理,确保任务执行的安全性。
- 端到端自动化:从用户请求到任务完成,全流程自动化,无需人工干预。
2. OpenHands 的整体架构
架构图
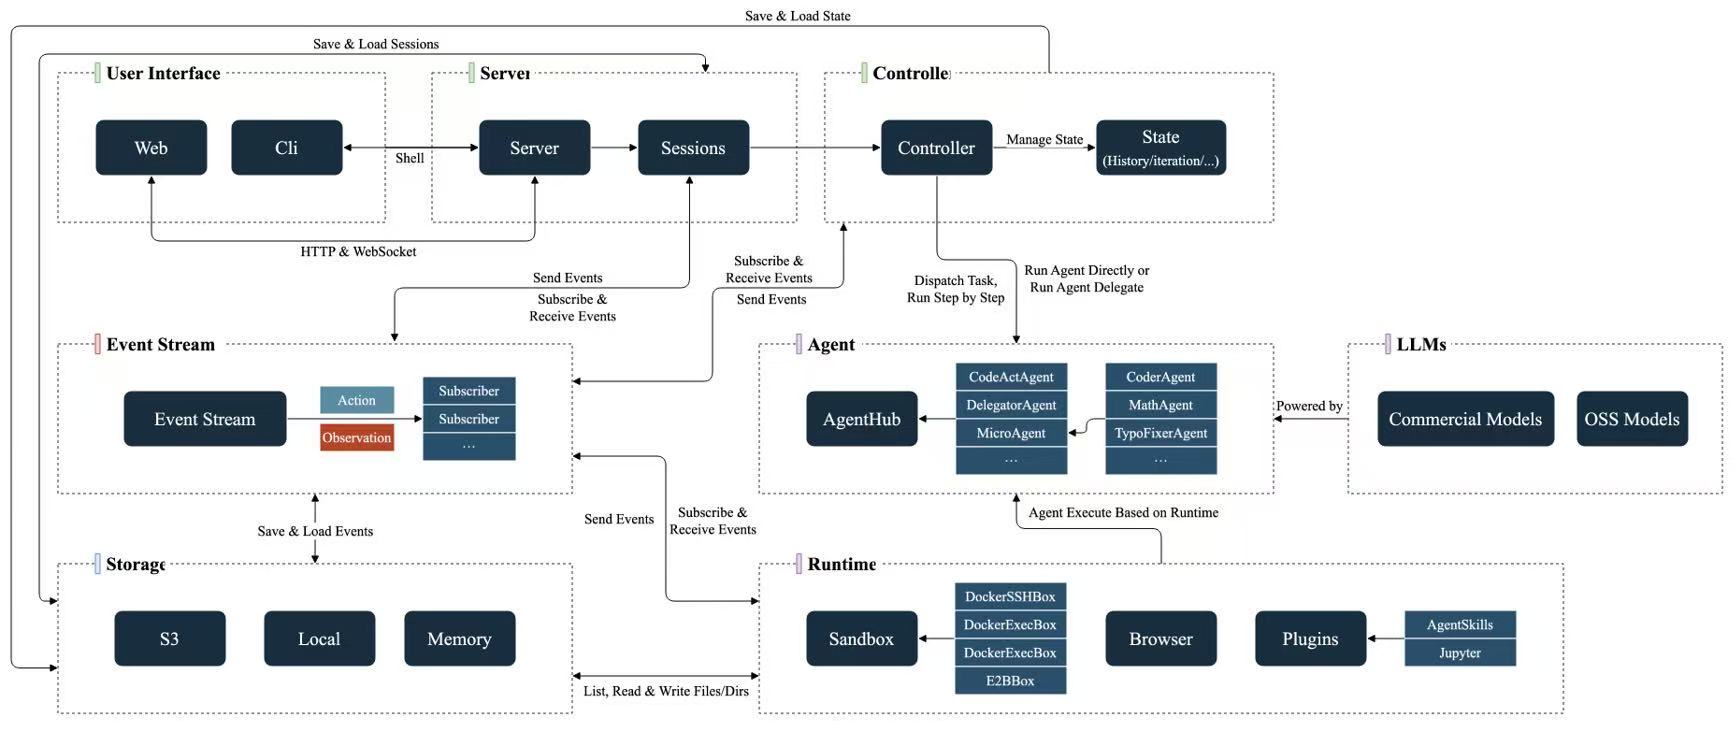 上图展示了 OpenHands 的整体架构,包括用户、前端、Server、Agent、MicroAgent、Sandbox/Browser/Shell 等模块之间的交互关系。
模块简介
| 模块名称 | 描述 |
|---|---|
| 用户 | 用户通过自然语言描述任务,例如“生成一个 Python 函数并编写单元测试”。用户请求是整个流程的起点。 |
| 前端 | 提供用户交互界面,支持文件上传、任务配置和结果展示,基于 React 构建,确保用户体验流畅。 |
| Server | 基于 FastAPI 构建,负责接收用户请求并将其转发给 Agent。Server 提供 RESTful API 接口,支持任务的分发、会话管理和请求验证,同时与前端交互,确保用户请求能够被正确解析并传递到后端的 Agent。 |
| Agent | OpenHands 的核心组件,负责解析用户请求、分解任务并协调执行。它是整个系统的“大脑”,通过调用 MicroAgent 和执行环境完成复杂任务。 |
| MicroAgent | 执行具体任务的子模块,例如文件操作、代码生成、测试运行等。每个 MicroAgent 专注于特定功能,支持动态加载和扩展,确保任务的灵活性和高效性。 |
| LLM | 提供强大的自然语言处理能力,支持任务解析、语义分析和动态评分标准生成,确保复杂任务能够被准确理解和执行。 |
| Memory | 管理会话记忆和上下文信息,确保任务执行的连续性。通过 Condenser 和 ConversationMemory 模块实现高效的记忆管理。 |
| Security | 负责权限管理和安全审计,确保任务执行的安全性。通过沙箱技术和严格的输入验证防止恶意代码注入。 |
| Storage | 负责数据存储和检索,支持任务结果的持久化,确保用户能够随时访问历史任务结果。 |
| Sandbox | 提供安全、隔离的任务执行环境,确保任务执行不会影响系统的其他部分。 |
| Browser/Shell | 实际的执行环境,用于完成 Web 自动化或 Shell 命令操作,支持跨平台和多种任务类型。 |
本文将对 OpenHands 的架构、工作流程、技术实现以及应用场景进行全面解析。通过深入剖析每个组件的设计原理与技术细节,帮助读者理解 OpenHands 的工作机制,并探索其在自动化领域的潜力。
3. 工作流程:从用户到执行环境
OpenHands 的工作流程是一个端到端的自动化过程,从用户请求到任务完成,每个步骤都经过精心设计以确保高效、准确和安全。以下是以自动化开发与部署一个 Web 应用为核心的详细工作流程解析。
3.1 用户请求的处理
用户交互:
- 用户通过前端描述任务,例如:
"创建一个待办事项管理工具,前端用 React,后端用 FastAPI,支持添加、删除和标记任务为完成。将其部署到 Vercel。"
- 前端通过 RESTful API 将请求发送到 Server。
- 用户通过前端描述任务,例如:
Server 的作用:
- Server 接收用户请求并通过 FastAPI 路由处理,定义在
openhands.server.routes.conversation.py中:@router.post("/api/v1/execute") async def execute_task(request: Request): data = await request.json() task_description = data.get("task_description") agent = Agent.get_cls("CodeActAgent")() result = await agent.handle_task(task_description) return {"result": result}
- Server 接收用户请求并通过 FastAPI 路由处理,定义在
3.2 CodeActAgent 的任务分解
任务分解:
- CodeActAgent 接收用户请求后,将其分解为多个子任务:
- 生成前端代码。
- 生成后端代码。
- 优化代码(调用 LLM)。
- 在本地运行测试。
- 打包代码并上传到 Vercel。
- CodeActAgent 接收用户请求后,将其分解为多个子任务:
调用 LLM:
- 使用 CodeActAgent 的
step方法与 LLM 交互,优化代码:def step(self, state: State) -> Action: messages = self._get_messages(state) params = {"messages": self.llm.format_messages_for_llm(messages)} response = self.llm.completion(**params) actions = codeact_function_calling.response_to_actions(response) for action in actions: self.pending_actions.append(action) return self.pending_actions.popleft()
- 使用 CodeActAgent 的
上下文管理:
- 使用 Memory 模块(如
ConversationMemory和Condenser)管理会话记忆和上下文信息:self.conversation_memory = ConversationMemory(self.prompt_manager) self.condenser = Condenser.from_config(self.config.condenser)
- 使用 Memory 模块(如
3.3 MicroAgent 的任务执行
在 OpenHands 中,MicroAgent 是执行具体任务的核心模块。以下是与 Todo App 开发和部署相关的 MicroAgent 实现:
CodeGenerationMicroAgent:
- 负责生成前端和后端代码。
- 示例代码(非 OpenHands 源码,仅为案例展示):
class CodeGenerationMicroAgent:
    def generate_frontend_code(self):
        return """
        import React, { useState } from 'react';

        function App() {
            const [tasks, setTasks] = useState([]);
            const addTask = (task) => setTasks([...tasks, { task, completed: false }]);
            const toggleTask = (index) => {
                const newTasks = [...tasks];
                newTasks[index].completed = !newTasks[index].completed;
                setTasks(newTasks);
            };
            return (
                <div>
                    <h1>Todo List</h1>
                    <input id="taskInput" placeholder="Add a task" />
                    <button onClick={() => addTask(document.getElementById('taskInput').value)}>Add</button>
                    <ul>
                        {tasks.map((t, i) => (
                            <li key={i} onClick={() => toggleTask(i)} style={{ textDecoration: t.completed ? 'line-through' : 'none' }}>
                                {t.task}
                            </li>
                        ))}
                    </ul>
                </div>
            );
        }

        export default App;
        """

    def generate_backend_code(self):
        return """
        from fastapi import FastAPI

        app = FastAPI()

        tasks = []

        @app.post("/add_task")
        def add_task(task: str):
            tasks.append({"task": task, "completed": False})
            return {"message": "Task added successfully"}

        @app.get("/tasks")
        def get_tasks():
            return tasks

        @app.put("/toggle_task/{index}")
        def toggle_task(index: int):
            if 0 <= index < len(tasks):
                tasks[index]["completed"] = not tasks[index]["completed"]
                return {"message": "Task updated successfully"}
            return {"error": "Invalid index"}
        """
BrowserMicroAgent:
- 负责自动化部署到 Vercel。
- 示例代码(非 OpenHands 源码,仅为案例展示):
class BrowserMicroAgent:
    def deploy_to_vercel(self, project_path):
        # 使用浏览器自动化完成部署
        browser = self.initialize_browser()
        browser.goto("https://vercel.com")
        browser.login("user@example.com", "password")
        browser.upload_project(project_path)
        return "https://todo-app.vercel.app"
3.4 执行环境的交互
OpenHands 的执行环境交互通过文件操作和路径解析实现,确保任务执行的安全性和隔离性。
文件路径解析:
- 使用
resolve_path方法将用户提供的路径解析为主机文件系统上的路径,同时确保路径安全性。 - 示例代码(真实代码):
def resolve_path(
    file_path: str,
    working_directory: str,
    workspace_base: str,
    workspace_mount_path_in_sandbox: str,
):
    path_in_sandbox = Path(file_path)
    if not path_in_sandbox.is_absolute():
        path_in_sandbox = Path(working_directory) / path_in_sandbox
    abs_path_in_sandbox = path_in_sandbox.resolve()
    if not abs_path_in_sandbox.is_relative_to(workspace_mount_path_in_sandbox):
        raise PermissionError(f'File access not permitted: {file_path}')
    path_in_workspace = abs_path_in_sandbox.relative_to(
        Path(workspace_mount_path_in_sandbox)
    )
    return Path(workspace_base) / path_in_workspace
- 使用
文件读取:
- 使用
read_file方法读取文件内容,返回FileReadObservation对象。 - 示例代码(真实代码):
async def read_file(
    path, workdir, workspace_base, workspace_mount_path_in_sandbox, start=0, end=-1
) -> Observation:
    try:
        whole_path = resolve_path(
            path, workdir, workspace_base, workspace_mount_path_in_sandbox
        )
    except PermissionError:
        return ErrorObservation(
            f"You're not allowed to access this path: {path}. You can only access paths inside the workspace."
        )
    try:
        with open(whole_path, 'r', encoding='utf-8') as file:
            lines = read_lines(file.readlines(), start, end)
    except FileNotFoundError:
        return ErrorObservation(f'File not found: {path}')
    except UnicodeDecodeError:
        return ErrorObservation(f'File could not be decoded as utf-8: {path}')
    except IsADirectoryError:
        return ErrorObservation(f'Path is a directory: {path}. You can only read files')
    code_view = ''.join(lines)
    return FileReadObservation(path=path, content=code_view)
- 使用
文件写入:
- 使用
write_file方法支持在指定范围内插入或覆盖文件内容。 - 示例代码(真实代码):
async def write_file(
    path,
    workdir,
    workspace_base,
    workspace_mount_path_in_sandbox,
    content,
    start=0,
    end=-1,
) -> Observation:
    insert = content.split('\\n')
    try:
        whole_path = resolve_path(
            path, workdir, workspace_base, workspace_mount_path_in_sandbox
        )
        if not os.path.exists(os.path.dirname(whole_path)):
            os.makedirs(os.path.dirname(whole_path))
        mode = 'w' if not os.path.exists(whole_path) else 'r+'
        with open(whole_path, mode, encoding='utf-8') as file:
            if mode != 'w':
                all_lines = file.readlines()
                new_file = insert_lines(insert, all_lines, start, end)
            else:
                new_file = [i + '\\n' for i in insert]
            file.seek(0)
            file.writelines(new_file)
            file.truncate()
    except PermissionError as e:
        return ErrorObservation(f'Permission error on {path}: {e}')
    return FileWriteObservation(content='', path=path)
- 使用
沙箱隔离:
- 文件操作严格限制在工作区内,确保任务执行的安全性。
3.5 结果返回
- 结果整合:
- CodeActAgent 整合 MicroAgent 的结果,并通过前端返回 Web 应用的部署链接。
- 示例返回结果:
{
    "result": "Web 应用已成功部署!访问链接:https://todo-app.vercel.app"
}
补充模块
Security:
- 确保任务执行的安全性,防止恶意代码注入。
- 示例代码:
class Security:
    def validate_input(self, input_data: dict):
        # 验证用户输入,防止恶意代码注入
        if "dangerous_command" in input_data:
            raise ValueError("Invalid input detected!")
Storage:
- 负责任务结果的持久化存储,支持用户随时访问历史任务结果。
- 示例代码:
class Storage:
    def save_result(self, task_id: str, result: dict):
        with open(f"{task_id}_result.json", "w") as f:
            json.dump(result, f)
4. 核心组件深度解析
OpenHands 的核心组件包括 Agent、MicroAgent 和执行环境。这些组件共同构成了系统的核心功能,确保任务能够高效、安全地完成。以下是对每个组件的详细剖析。
4.1 Agent
Agent 是 OpenHands 的“大脑”,负责接收用户请求、解析任务并协调 MicroAgent 执行具体操作。每个 Agent 都专注于特定的功能领域,例如代码生成、网页浏览或任务分发。
Agent 分类表格
| Agent 名称 | 路径 | 功能描述 |
|---|---|---|
| BrowsingAgent | agenthub/browsing_agent/ | 处理网页浏览相关任务,例如从网页中提取信息。 |
| CodeActAgent | agenthub/codeact_agent/ | 专注于代码相关任务,例如代码生成、修复或分析。 |
| DelegatorAgent | agenthub/delegator_agent/ | 负责任务的分解和分发,协调多个 Agent 和 MicroAgent 的工作。 |
| DummyAgent | agenthub/dummy_agent/ | 一个简单的占位 Agent,主要用于测试或演示。 |
| VisualBrowsingAgent | agenthub/visualbrowsing_agent/ | 专注于视觉浏览任务,例如处理网页的视觉元素或截图。 |
| MicroAgent | agenthub/micro/ | 包含多个子模块,专注于特定领域的微任务,例如代码处理、数据库操作等。 |
MicroAgent 分类表格
| MicroAgent 名称 | 路径 | 功能描述 |
|---|---|---|
| InstructionsMicroAgent | agenthub/micro/instructions.py | 加载和组织指令文件,构建嵌套字典结构。 |
| RegistryMicroAgent | agenthub/micro/registry.py | 注册所有 MicroAgent,加载其定义和提示文件。 |
| BaseMicroAgent | agenthub/micro/agent.py | 定义 MicroAgent 的基础功能,包括历史事件序列化、模板渲染和 LLM 调用。 |
| ManagerMicroAgent | agenthub/micro/manager/ | 管理任务的分配和执行。 |
| CommitWriterMicroAgent | agenthub/micro/commit_writer/ | 负责生成和提交代码变更。 |
| TypoFixerMicroAgent | agenthub/micro/typo_fixer_agent/ | 自动修复代码中的拼写错误。 |
| StudyRepoMicroAgent | agenthub/micro/study_repo_for_task/ | 分析代码仓库以支持任务执行。 |
| MathMicroAgent | agenthub/micro/math_agent/ | 执行数学计算任务。 |
| RepoExplorerMicroAgent | agenthub/micro/repo_explorer/ | 浏览和分析代码仓库。 |
| VerifierMicroAgent | agenthub/micro/verifier/ | 验证任务执行结果的正确性。 |
| PostgresMicroAgent | agenthub/micro/postgres_agent/ | 执行 PostgreSQL 数据库相关操作。 |
| CoderMicroAgent | agenthub/micro/coder/ | 负责代码生成和优化。 |
Agent 的注册与调用
- 注册:
- 每个 Agent 在初始化时会注册到 Agent Hub。
- 注册信息包括 Agent 的名称、功能描述和路径。
- 调用:
- 用户请求通过 Agent Hub 分发到合适的 Agent。
- Agent Hub 根据任务类型选择合适的 Agent 或 MicroAgent。
示例代码:Agent 的注册
from openhands.agenthub import AgentHub

# 注册 BrowsingAgent
AgentHub.register_agent(
    name="BrowsingAgent",
    path="agenthub/browsing_agent/",
    description="处理网页浏览相关任务"
)

# 注册 CodeActAgent
AgentHub.register_agent(
    name="CodeActAgent",
    path="agenthub/codeact_agent/",
    description="专注于代码相关任务"
)
示例代码:Agent 的调用
from openhands.agenthub import AgentHub

# 用户请求
user_request = "提取 https://example.com 的标题和内容"

# 调用合适的 Agent
agent = AgentHub.get_agent("BrowsingAgent")
result = agent.handle_request(user_request)

print(result)
4.2 MicroAgent
MicroAgent 是 Agent 的子模块,专注于特定领域的功能实现。它们是模块化的组件,例如处理代码、数据库操作或拼写修复。
职责
- 任务执行:
- 根据 Agent 的指令执行具体任务。
- 例如,生成代码、修改文件、运行测试等。
- 模块化设计:
- 每个 MicroAgent 专注于特定功能,支持动态加载和扩展。
示例代码:MicroAgent 的执行
class CodeGenerationMicroAgent:
    async def execute(self, task):
        # 执行代码生成逻辑
        code = self.generate_code(task["content"])
        return code

    def generate_code(self, content):
        # 简单生成代码
        return f"def fibonacci(n):\n    if n <= 1: return n\n    return fibonacci(n-1) + fibonacci(n-2)"
4.3 执行环境
执行环境是 OpenHands 的“工作场所”,包括 Sandbox、Browser 和 Shell。
职责
- 安全执行:
- 提供隔离的执行环境,确保任务执行的安全性。
- 跨环境支持:
- 支持多种任务类型,例如 Web 自动化、Shell 命令执行等。
示例代码:执行环境的交互
class Sandbox:
    def execute_code(self, code):
        # 在隔离环境中执行代码
        exec(code)

class Browser:
    def load_page(self, url):
        # 使用浏览器加载网页
        return f"Loaded page: {url}"

class Shell:
    def run_command(self, command):
        # 执行系统命令
        return f"Executed command: {command}"
技术挑战
- 安全性:
- 解决方案:严格限制沙箱权限,防止恶意代码访问系统资源。
- 性能优化:
- 解决方案:使用轻量级容器技术(如 Docker)减少资源开销。
5. 技术栈与实现细节
OpenHands 的技术栈涵盖了后端、前端、通信机制和安全性设计。以下是对每个部分的详细解析。
5.1 后端(Python)
后端是 OpenHands 的核心逻辑层,负责处理用户请求、任务分解和执行。
使用的框架与库
| 框架/库名称 | 功能描述 |
|---|---|
| Flask/FastAPI | 用于构建 REST API,支持高效的请求处理。 |
| Pytest | 用于单元测试和集成测试,确保代码质量。 |
| Asyncio | 实现异步任务处理,提高系统的并发能力。 |
代码组织与模块化设计
| 目录结构 | 描述 |
|---|---|
openhands/agent/ | Agent 的实现。 |
openhands/microagent/ | MicroAgent 的实现。 |
openhands/sandbox/ | 执行环境的实现。 |
tests/unit/ | 单元测试代码。 |
关键功能实现
| 功能 | 描述 |
|---|---|
| 任务分解 | 使用规则或 AI 模型解析用户请求并分解任务。 |
| 上下文管理 | 使用字典或树结构存储任务上下文信息。 |
| 错误处理 | 设计错误恢复机制,确保任务失败时能够自动重试。 |
5.2 前端(React)
前端是用户与 OpenHands 交互的界面,提供直观的操作体验。
用户界面的设计与交互
- React 框架:
- 构建动态、响应式的用户界面。
- 组件化设计:
- 每个功能模块对应一个独立的 React 组件,支持复用和扩展。
- 状态管理:
- 使用 Redux 或 Context API 管理应用状态。
国际化支持
- 工具:
- 使用 i18next 实现多语言支持。
- 环境变量配置:
- 在
frontend/.env文件中设置国际化相关变量。
- 在
构建与优化
- 构建工具:
- 使用 Webpack 或 Vite 构建前端代码。
- 性能优化:
- 通过代码分割和懒加载减少页面加载时间。
5.3 通信机制
通信机制是前后端以及 Agent 与 MicroAgent 之间的桥梁。
前后端通信
- REST API:
- 使用 HTTP 协议实现前后端通信。
- 例如,前端发送用户请求到后端,后端返回任务结果。
- WebSocket:
- 实现实时通信,例如任务进度更新。
Agent 与 MicroAgent 的通信
- 协议设计:
- 使用 JSON 格式传递任务指令和结果。
- 异步调用:
- 使用 Python 的 asyncio 实现异步通信。
5.4 安全性
安全性是 OpenHands 的重要设计目标,确保用户数据和任务执行的安全。
数据安全
- 加密:
- 使用 HTTPS 加密通信,防止数据泄露。
- 权限管理:
- 限制用户对系统资源的访问权限。
任务执行安全
- 沙箱技术:
- 使用容器或虚拟机隔离任务执行环境。
- 输入验证:
- 验证用户输入,防止恶意代码注入。
系统安全
- 防火墙:
- 使用防火墙保护系统免受外部攻击。
- 日志监控:
- 记录系统日志,检测异常行为。